Generate and use SSH keys with Sitehost
On this page:
- Overview
- Generate SSH keys on Linux/Mac
- Generate SSH keys on Windows
- Add a public key to Sitehost
- Connect to Sitehost using SSH keys in various applications
Overview
To use SSH keys on Sitehost, follow the instructions for your operating system.
Note:
Generate SSH keys on Linux/Mac
- Generate a public/private key pair:
- Log into the computer you will use to access Sitehost, and then use the command line to generate a key pair. To generate RSA keys, on the command line, enter:
ssh-keygen -t rsa - You will be prompted to supply a filename (for saving the key pair) and a passphrase (for protecting your private key):
- Filename: To accept the default filename and location for your key pair, press
EnterorReturnwithout entering a filename. Alternatively, you can enter a filename (for example,my_ssh_key) at the prompt, and then pressEnterorReturn. - Passphrase: Enter a passphrase that contains at least five characters, and then press
EnterorReturn. If you pressEnterorReturnwithout entering a passphrase, your private key will be generated without password protection.
- Filename: To accept the default filename and location for your key pair, press
- Log into the computer you will use to access Sitehost, and then use the command line to generate a key pair. To generate RSA keys, on the command line, enter:
- Once the key pair has been generated, navigate to the location where you saved the public key.
- Copy the contents of your public key (this is the file with the
.pubextension). - Once you copy the contents of your public key, see Add a public key to Sitehost below.
Generate SSH keys on Windows
- Install PuTTY. The PuTTY command-line SSH client, the PuTTYgen key generation utility, the Pageant SSH authentication agent, and the PuTTY SCP and SFTP utilities are packaged together in a Windows installer available under The MIT License for free download from the PuTTY development team.
- Launch .
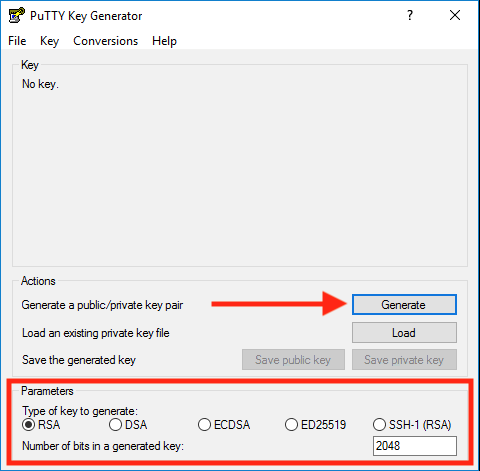
- In the "PuTTY Key Generator" window, under "Parameters":
- For "Type of key to generate", select . (In older versions of PuTTYgen, select .)
- For "Number of bits in a generated key", leave the default value (
2048).
- Under "Actions", click .

- When prompted, use your mouse (or trackpad) to move your cursor around the blank area under "Key"; this generates randomness that PuTTYgen uses to generate your key pair.
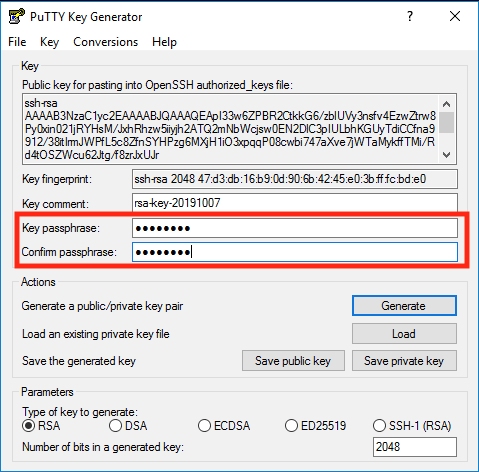
- When your key pair is generated, PuTTYgen displays the public key in the area under "Key". In the "Key passphrase" and "Confirm passphrase" text boxes, enter a passphrase to passphrase-protect your private key.
 Note:
Note: - Right-click in the "Public key for pasting into OpenSSH authorized_keys file" text box, choose , and then right-click in the text box again and select .
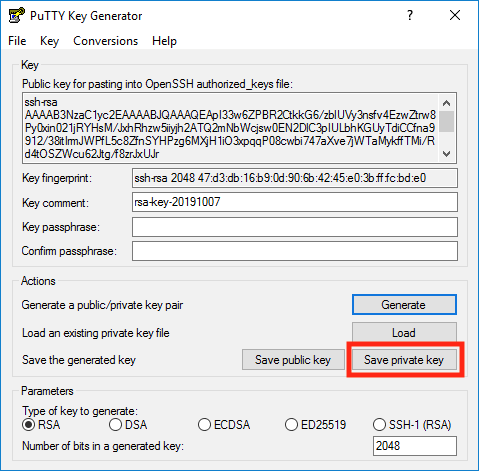
- Save your private key in a safe place. You'll use the passphrase any time you log into a Sitehost server using SSH keys, and you'll need to copy the public key to your profile on the WebTech website. To save your private key:
- Under "Actions", next to "Save the generated key", click .
 Note:
Note: - Keep "Save as type" set to , give the file a name (for example,
putty_private_key), select a location on your computer to store it, and then click . - If you wish to connect to a remote desktop system such as Research Desktop (RED), click , give the file a name (for example,
putty_rsa), select a location on your computer to store it, and then click .
- Under "Actions", next to "Save the generated key", click .
Note:
Add a public key to Sitehost
- Go to Enterprise Web Technical Services.
- At the top right, click , and, if prompted, log in with your IU username and passphrase.
- At the top right, click your name. When you see the drop-down menu, click .
- Under "Manage SSH keys":
- In the "Note" field, enter a short description.
- In the "Public Key" field, paste the public key you copied in step 7 above.
- Click . If the public key is valid, it will be added to your profile. Within 30 minutes, the public key will be added to all Sitehost-test and Sitehost accounts that you own, or for which you are a proxy or developer.